
How to use custom layouts in Next.js?
Next.js has emerged as a leading framework for building React applications, offering features like server-side rendering and static site generation. One aspect of web development that Next.js simplifies is the use of layouts. Layouts are a powerful design pattern that helps developers maintain consistency across different pages of an application. They allow you to define a common structure for your pages, such as headers, footers, and navigation bars, without having to repeat the same code on every page. In this article, we'll explore how to use custom layouts in Next.js to create more maintainable and scalable applications.
Understanding Layouts in Next.js
In Next.js, a layout is essentially a React component that wraps around your page components. This component can include any shared UI elements that you want to display across multiple pages, such as navigation bars, footers, or sidebars. By using layouts, you can ensure that these elements are consistently rendered across your application, while also making it easy to make global changes from a single location.
Implementing Custom Layouts
Create a Layout Component
First, you need to create a layout component. This component will contain the structure shared across multiple pages. For example, you might have a file named layout.js in your components directory with the following content:
import React from "react";

const Layout = ({ children }) => (
  <div>
    <header>{/* Navigation bar goes here */}</header>
    <main>{children}</main>
    <footer>{/* Footer content goes here */}</footer>
  </div>
);

export default Layout;
In this example, the Layout component accepts a children prop, which represents the content of the pages that will be wrapped by the layout.
Use the Layout in Your Pages
Next, you need to use the layout component in your pages. You can wrap your page content with the Layout component to apply the common structure. Here's an example with a page component:
import Layout from "../components/layout";

const HomePage = () => (
  <Layout>
    <h1>Welcome to the Home Page</h1>
    {/* More content here */}
  </Layout>
);

export default HomePage;
By wrapping the HomePage component with the Layout component, the home page will now include the common navigation bar and footer defined in Layout.
Making Layouts More Flexible
In some cases, you might need different layouts for different parts of your application. You can achieve this flexibility by passing the layout as a prop to your pages or by creating multiple layout components.
Passing Layout as a Prop
You can pass the layout component as a prop to your pages and then use it to wrap the page content. This approach gives you the flexibility to use different layouts for different pages.
For example, you can modify your page component to accept a layout prop:
const HomePage = ({ layout: Layout }) => (
  <Layout>
    <h1>Welcome to the Home Page</h1>
    {/* More content here */}
  </Layout>
);

export default HomePage;
Then, when you use the HomePage component, you can specify which layout to use:
import SpecificLayout from "../components/specificLayout";
import HomePage from "../components/homePage";

const Page = () => <HomePage layout={SpecificLayout} />;

export default Page;
Creating Multiple Layout Components
Alternatively, you can create multiple layout components for different parts of your application. For example, you might have MainLayout, DashboardLayout, and AuthLayout components. You can then import and use these layout components in your pages as needed.
Using Next.js's Built-in CSS Support
To style your layouts, you can use Next.js's built-in CSS and Sass support. You can create separate CSS files for your layouts and import them into your layout components. This approach helps you keep your styles organized and ensures that your layouts are easily maintainable.
Advanced Techniques and Best Practices for Custom Layouts in Next.js
Building upon the basic implementation of custom layouts in Next.js, let's explore some advanced techniques and best practices that can help you create more dynamic, efficient, and scalable applications.
Dynamic Layouts Based on Page Properties
In some cases, you may want to dynamically change the layout based on specific properties of the page. For instance, you might want different layouts for authenticated users versus guests. You can achieve this by passing props to your layout components and conditionally rendering content based on those props.
const Layout = ({ children, isAuthenticated }) => (
  <div>
    <header>
      {/* Conditional rendering based on isAuthenticated */}
      {isAuthenticated ? <UserNav /> : <GuestNav />}
    </header>
    <main>{children}</main>
    <footer>{/* Footer content */}</footer>
  </div>
);

export default Layout;
In your page components, you would then pass the necessary props to the Layout:
<Layout isAuthenticated={user.isAuthenticated}>{/* Page content */}</Layout>
Layouts with Next.js's getInitialProps or getServerSideProps
Next.js pages and components can fetch data before rendering using getInitialProps or getServerSideProps. However, layouts themselves do not directly support these data-fetching methods since they are not page components. To work around this, you can fetch data in your pages or through a higher-order component and pass the data down to the layout.
For example, if you need to fetch user data and pass it to your layout:
// In your page component
export async function getServerSideProps(context) {
  const userData = await fetchUserData();
  return { props: { userData } };
}

const HomePage = ({ userData }) => (
  <Layout userData={userData}>{/* Page content */}</Layout>
);
Using Context for Global Layout Data
For data or state that needs to be accessible across all layouts and pages, consider using React's Context API. This is particularly useful for themes, user authentication states, and other global settings.
First, create a context:
import { createContext, useContext } from "react";

const LayoutContext = createContext();

export const useLayoutContext = () => useContext(LayoutContext);

export const LayoutProvider = ({ children, value }) => (
  <LayoutContext.Provider value={value}>{children}</LayoutContext.Provider>
);
Wrap your application with the LayoutProvider in _app.js, and pass down the global state:
import { LayoutProvider } from "../contexts/LayoutContext";

function MyApp({ Component, pageProps }) {
  return (
    <LayoutProvider
      value={
        {
          /* global state values */
        }
      }
    >
      <Component {...pageProps} />
    </LayoutProvider>
  );
}

export default MyApp;
Now, you can access this context from any layout or page component:
const { user } = useLayoutContext();
Best Practices for Custom Layouts in Next.js
- Keep Layouts Simple: Layouts are meant for common structural components. Avoid overloading them with logic or data-fetching operations that are specific to individual pages.
- Use Semantic HTML: Ensure your layouts use semantic HTML elements (
<header>,<footer>,<main>, etc.) for better accessibility and SEO. - Optimize for Performance: Consider performance implications of your layouts. For example, avoid unnecessary re-renders by memoizing components or using React's
React.memofor layout components that don't change often. - Testing: Layout components, like any other component, should be tested. Use tools like Jest and React Testing Library to test the rendering and functionality of your layouts.
These advanced techniques and best practices into your Next.js projects, you can create custom layouts that are not only flexible and maintainable but also optimized for performance and scalability.
Leveraging Next.js Features for Enhanced Layout Management
Next.js offers several features that can further enhance your layout management strategy. Let's delve into how you can leverage these features to create more sophisticated and efficient layouts.
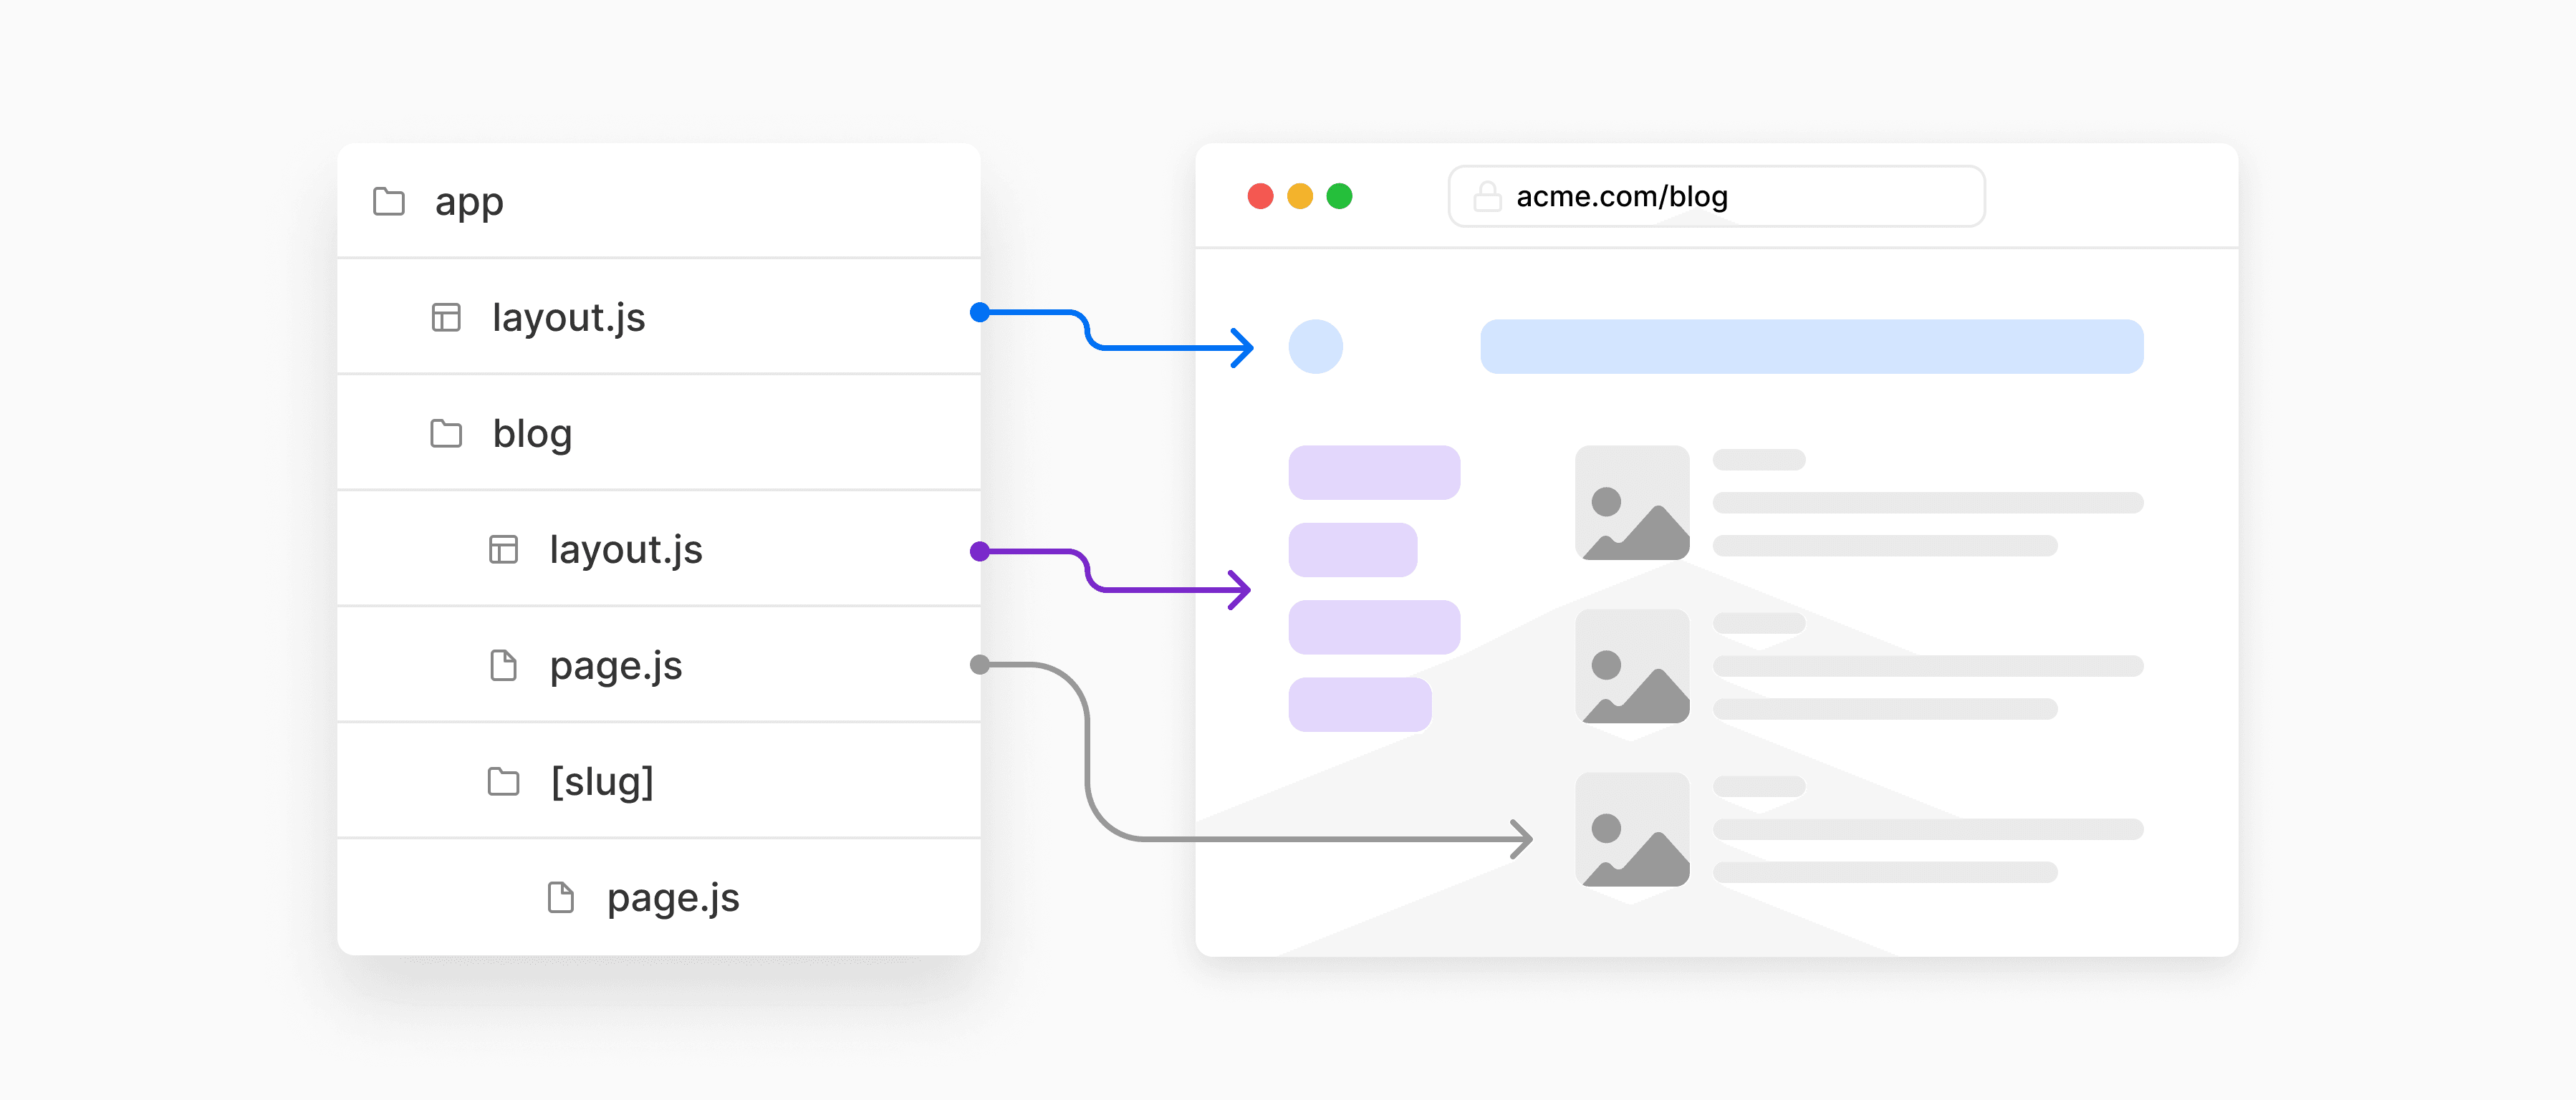
Nested Layouts
For applications that require complex UI structures, nested layouts can be a powerful tool. This approach allows you to define layouts within layouts, offering a hierarchical structure that can be particularly useful for large applications with varied UI sections.
To implement nested layouts, you can create layout components that accept and render children, similar to the basic layout pattern. Then, you can nest these layout components as needed.
// parentLayout.js
export default function ParentLayout({ children }) {
  return (
    <div>
      <header>Global Header</header>
      <main>{children}</main>
    </div>
  );
}

// childLayout.js
export default function ChildLayout({ children }) {
  return (
    <div>
      <aside>Sidebar Content</aside>
      <section>{children}</section>
    </div>
  );
}
In your page component, you can nest these layouts:
import ParentLayout from "../components/parentLayout";
import ChildLayout from "../components/childLayout";

const NestedLayoutPage = () => (
  <ParentLayout>
    <ChildLayout>
      <h1>Page Content</h1>
    </ChildLayout>
  </ParentLayout>
);

export default NestedLayoutPage;
Layouts with _app.js
The custom App component (_app.js) in Next.js allows you to initialize pages and inject shared functionality across all pages, making it an ideal place to implement a global layout or to set up context providers.
To apply a global layout, you can wrap the Component prop with your layout component in _app.js:
// pages/_app.js
import Layout from "../components/layout";

function MyApp({ Component, pageProps }) {
  return (
    <Layout>
      <Component {...pageProps} />
    </Layout>
  );
}

export default MyApp;
This pattern applies your layout to all pages. If you need conditional layouts or more granular control, you can extend this approach by using page props or context.
Optimizing Layouts with CSS Modules or Styled Components
Next.js supports CSS Modules out of the box, and you can easily integrate styled-components for scoped and dynamic styling. Leveraging these tools can help you manage your layout styles more effectively.
For CSS Modules, create a CSS file corresponding to your layout component (e.g., layout.module.css) and import it into your layout component:
// layout.module.css
.header {
  /* styles */
}

// layout.js
import styles from './layout.module.css';

const Layout = ({ children }) => (
  <div>
    <header className={styles.header}>Header</header>
    <main>{children}</main>
  </div>
);
For styled-components, you can define styled elements within your layout component or in a separate file:
import styled from "styled-components";

const Header = styled.header`
  /* styles */
`;

const Layout = ({ children }) => (
  <div>
    <Header>Header</Header>
    <main>{children}</main>
  </div>
);
Utilizing TypeScript for Strongly Typed Layouts
If you're using TypeScript with Next.js, you can enhance your layouts with type safety, making your code more robust and maintainable. Define types for your layout props to ensure that the correct data is passed to and used within your layouts.
import { ReactNode } from "react";

interface LayoutProps {
  children: ReactNode;
  // Additional props as needed
}

const Layout = ({ children }: LayoutProps) => (
  <div>
    <header>Header</header>
    <main>{children}</main>
  </div>
);

export default Layout;
These Next.js features and strategies, you can create custom layouts that are not only tailored to your application's needs but also optimized for performance, maintainability, and scalability. Whether you're building a simple blog or a complex enterprise application, effective layout management is key to delivering a high-quality user experience.
Conclusion
Custom layouts in Next.js offer a powerful and flexible way to maintain consistency across your application while avoiding code duplication. By creating layout components and using them across your pages, you can ensure that common elements like headers and footers are consistently rendered. With the ability to create multiple layouts and pass them as props, you can easily manage different structures for different parts of your application, making your Next.js projects more scalable and maintainable.


