How to disable or enable comments on specific WordPress pages?
Disabling or enabling comments on specific pages of a WordPress site is a straightforward process that can significantly enhance the user experience and manage interactions on your site more effectively. Comments can be a great way to engage with your audience, but there are times when you might want to disable them on certain pages to keep the focus on the content or to manage spam. Conversely, enabling comments on pages where they were previously disabled can invite valuable feedback and community interaction. Here’s a detailed guide on how to manage comments on specific WordPress pages.
Accessing the WordPress Dashboard
Before you begin, ensure you have administrative access to your WordPress site. You’ll need to log in to your WordPress dashboard, which is typically found at yourdomain.com/wp-admin. Enter your username and password to proceed.
Disabling Comments on Specific Pages
Method 1: Via the Page Editor
-
Navigate to Pages: On your WordPress dashboard, locate the
Pagesmenu on the left-hand side. ClickAll Pagesto view a list of all the pages on your website. -
Edit the Page: Hover over the page title where you want to disable comments, and click the
Editlink that appears beneath it. -
Disable Comments: In the page editor, you might see the option to disable comments in different locations based on the WordPress editor you are using (Classic Editor or Block Editor).
-
For Classic Editor: Look for the
Discussionbox on the edit page screen. If you don’t see it, click onScreen Optionsat the top right of your screen and ensure theDiscussioncheckbox is checked. Then, uncheck theAllow commentsoption in the Discussion box. -
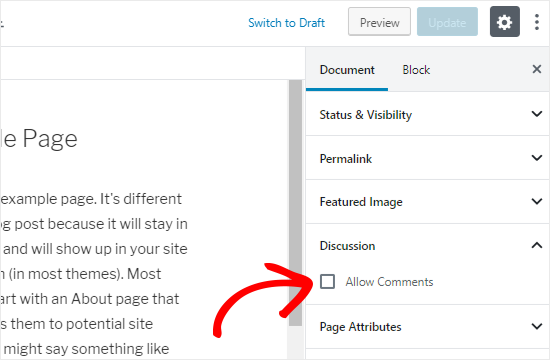
For Block Editor (Gutenberg): Click on the
Documenttab on the right-hand side of the editor. Scroll down to find theDiscussionpanel and uncheck theAllow commentsoption.
-
-
Update the Page: Click the
Updatebutton to save your changes. Comments will now be disabled on that specific page.
Method 2: Using a Plugin
For those who prefer using plugins to manage comments:
-
Install a Plugin: Install a WordPress plugin designed for comment management, such as
Disable CommentsorWP Disable Comments. These plugins allow you to disable comments on specific pages or post types with ease. -
Configure the Plugin: Once installed, navigate to the plugin’s settings page in your WordPress dashboard. Here, you can select the specific pages or types of content where you want to disable comments.
Enabling Comments on Specific Pages
If comments are disabled globally on your site or for specific pages, and you wish to enable them for certain pages, follow these steps:
-
Navigate to the Page Editor: As before, go to
Pages>All Pagesand clickEditon the page where you want to enable comments. -
Enable Comments: In the page editor, locate the
Discussionbox or panel (depending on your editor).- For Classic Editor: Ensure the
Allow commentsoption is checked in the Discussion box. - For Block Editor: Check the
Allow commentsoption in the Document tab under Discussion.
- For Classic Editor: Ensure the
-
Update the Page: Click the
Updatebutton. Comments will now be enabled on that specific page.
Advanced Comment Management Strategies
Beyond simply enabling or disabling comments on specific pages, there are several advanced strategies you can employ to further refine the way comments work on your WordPress site. These strategies can help enhance user engagement, reduce spam, and ensure that the comment section of your WordPress site contributes positively to your overall site goals.
Moderating Comments
Setting up a moderation system for comments allows you to review them before they go live. This can be particularly useful for high-traffic sites or pages on sensitive topics where unmoderated comments could lead to spam or toxic discussions.
- Navigate to Settings: In your WordPress dashboard, go to
Settings>Discussion. - Adjust Moderation Settings: Look for the
Before a comment appearssection. Here, you can choose to manually approve each comment, only approve comments from previously approved commenters, or set specific criteria that trigger moderation.
Using CAPTCHA
To reduce spam, consider adding a CAPTCHA to your comment form. This can deter automated bots from posting spam comments on your site.
- Install a CAPTCHA Plugin: Search for a CAPTCHA plugin in the WordPress plugin directory. Popular options include
reCAPTCHA by GoogleandWPBruiser. - Configure the Plugin: Follow the plugin’s setup instructions to integrate CAPTCHA with your comment form. This typically involves obtaining API keys from the CAPTCHA service and configuring where the CAPTCHA appears.
Closing Comments Automatically
If your website’s older posts are attracting spam, consider automatically closing comments after a certain period.
- Adjust Discussion Settings: In
Settings>Discussion, look for theAutomatically close comments on articles older thanoption. - Set the Number of Days: Enter the number of days after which comments should be closed on posts. This helps focus the conversation on newer content and reduces spam on older posts.
Managing Comments in Bulk
For websites with a large number of pages or posts, managing comments individually might not be practical. WordPress allows for bulk management of comments.
- Navigate to Comments: In your WordPress dashboard, click on
Comments. - Bulk Actions: Use the checkboxes to select multiple comments. Then, choose an action from the
Bulk actionsdropdown menu, such asApprove,Unapprove,Mark as Spam, orMove to Trash. - Apply: Click the
Applybutton to perform the action on all selected comments.
Leveraging Comment Management Plugins
For more advanced comment management features, consider using plugins that offer enhanced functionality. Plugins like Akismet for spam prevention, Disqus for an alternative commenting system, and wpDiscuz for an improved commenting interface can provide additional layers of control and engagement opportunities.
FAQ: Managing Comments on WordPress Pages

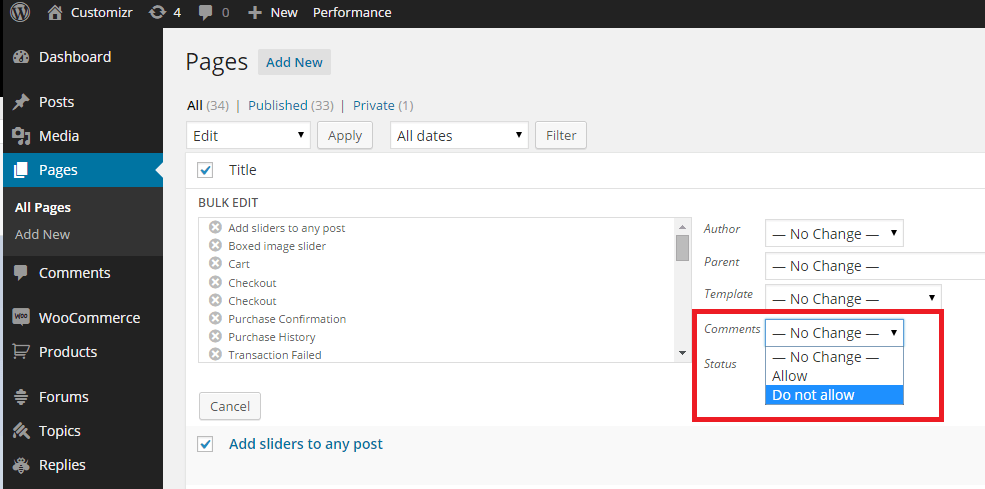
Yes, you can disable comments in bulk for all pages. To do this, go to Pages > All Pages in your WordPress dashboard. Click the checkbox at the top of the list to select all pages, then choose Edit from the Bulk Actions dropdown menu and click Apply. In the Bulk Edit box, change the Comments to Do not allow, and then click the Update button. Note that this action applies to all selected pages, so use it with caution.
Yes, WordPress allows you to configure settings to disable comments on future pages by default. Navigate to Settings > Discussion from your WordPress dashboard. Under the Default article settings, uncheck the option that says Allow people to post comments on new articles. Keep in mind, this setting applies to new content and will not affect existing pages.
Disabling comments for a specific custom post type might require additional steps or the use of a plugin, especially if the post type does not support the standard discussion settings. Using a plugin like Disable Comments allows you to manage comment settings more granularly, including disabling them for custom post types.
No, disabling comments on a page does not delete existing comments. It only prevents new comments from being submitted. If you wish to remove existing comments, you will need to do so manually by going to Comments in the WordPress dashboard and deleting them individually or in bulk.
Yes, it's possible to hide comments without fully disabling them. This can be done with custom CSS or by modifying your WordPress theme's files. However, for most users, using a plugin to manage the visibility of comments is a simpler and safer approach. Plugins like WP Hide Post allow you to control the visibility of comments and other elements on a per-post basis.
If the "Allow comments" option is not visible in your page or post editor, it may be hidden from the screen options. In the Classic Editor, click on Screen Options at the top right corner and make sure that the Discussion checkbox is selected. In the Block Editor (Gutenberg), the option should be under the Discussion panel when you click on the Document tab; if it's missing, ensure your theme supports comments and check for any plugins that might be affecting this functionality.
WordPress offers several ways to manage spam comments. Activating plugins like Akismet Anti-Spam helps filter out spam comments automatically. Additionally, under Settings > Discussion, you can configure strict rules for comment moderation, such as requiring manual approval for comments or automatically holding comments with links in moderation.
Comments can also be enabled on media attachments in WordPress, which might not be desirable for all website owners. To disable comments on all media attachments, you might need to run a little bit of SQL in your database, which is recommended for advanced users only, or use a plugin that provides this functionality. Plugins that manage comment settings often include the option to disable comments on media attachments as well.
Yes, the ability to enable or disable comments on pages or posts in WordPress is typically restricted to users with the Administrator or Editor roles. Contributors and Subscribers usually do not have the capability to modify comment settings. Ensure you have the appropriate user role if you're unable to access these settings.
WordPress includes a feature that allows you to automatically close comments on articles older than a certain number of days. To enable this, go to Settings > Discussion, and look for the option labeled "Automatically close comments on articles older than X days," where X is the number of days you choose. This can help manage comments on older posts and reduce spam.
Conclusion
Effective comment management is crucial for maintaining a healthy and engaging WordPress site. By strategically enabling or disabling comments on specific pages, and employing advanced techniques like moderation, CAPTCHA, and automatic closing, you can foster a more positive and interactive community. Remember, the goal of comments should always be to add value to your content and engage your audience in meaningful ways. With the right strategies in place, you can ensure that your site’s comment sections reflect the quality and professionalism of your WordPress site.


