How to integrate a Next.js app with a backend server?
Next.js is a popular React framework known for its simplicity and ease of use, especially when building server-rendered applications. However, creating a full-fledged application often requires integration with a backend server for data persistence, user authentication, and other server-side functionalities. In this article, we will explore how to integrate a Next.js app with a backend server, focusing on key aspects such as API routes, fetching data, and managing state.
Understanding the Architecture
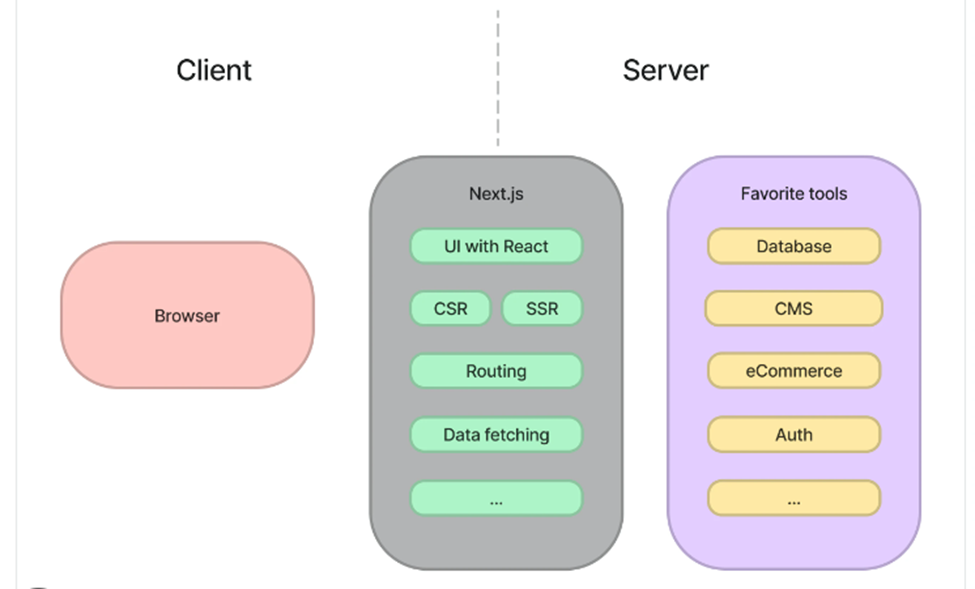
Before diving into the integration, it's crucial to understand the typical architecture of a Next.js application with a backend server. The frontend (Next.js app) is responsible for rendering the user interface and handling user interactions, while the backend handles data management, business logic, and interactions with a database or other services.
Setting Up the Backend Server
First, set up your backend server. This could be a Node.js server using Express, a Python server using Django or Flask, or any other technology stack of your preference. Ensure that your backend server exposes an API, typically REST or GraphQL, which your Next.js app can consume.

Example: Express.js Backend
const express = require("express");
const app = express();
const port = 3001;

app.get("/api/data", (req, res) => {
  res.json({ message: "Hello from the backend!" });
});

app.listen(port, () => {
  console.log(`Backend server running on http://localhost:${port}`);
});
Creating API Routes in Next.js
Next.js provides API routes, allowing you to create server-side API endpoints within your Next.js application. However, for this guide, we focus on integrating with an external backend server.
Fetching Data from the Backend
To communicate with the backend, you can use fetch API, Axios, or any other HTTP client in your Next.js application. You can fetch data in different lifecycle methods depending on the need - getServerSideProps for server-side rendering, getStaticProps for static generation, or using React hooks like useEffect for client-side fetching.
Example: Fetching Data in getServerSideProps
export async function getServerSideProps(context) {
  const res = await fetch("http://localhost:3001/api/data");
  const data = await res.json();

  return {
    props: { data }, // will be passed to the page component as props
  };
}
Managing State and Re-rendering
For state management, you can use React's built-in useState and useEffect hooks, or adopt libraries like Redux or MobX. When the state changes, due to data fetching or user actions, React re-renders the component to reflect the new state.
Handling CORS
Cross-Origin Resource Sharing (CORS) can be a common issue when the backend and frontend are hosted on different domains. Ensure that your backend server includes appropriate CORS headers to allow requests from your Next.js domain.
Example: Enabling CORS in Express.js
const cors = require("cors");
app.use(cors());
Securing the Integration
Security is crucial in web application development. Ensure that your API is secured using techniques such as JWT tokens for authentication, HTTPS for data encryption, and input validation to prevent SQL injection and other attacks.
Optimizing Performance
Optimize the performance of your application by minimizing the number of API requests, caching responses when appropriate, and using efficient data-fetching strategies like lazy loading or pagination.

Debugging and Testing
Debugging and testing are essential parts of the development process. Use tools like Postman or Insomnia for API testing, and adopt a testing framework like Jest for your Next.js application.
Advanced Techniques and Best Practices for Integration
Building on the basics, let's explore some advanced techniques and best practices that can enhance the integration of a Next.js app with a backend server.
Server-Side Rendering (SSR) with API Calls
One of the most powerful features of Next.js is its ability to perform server-side rendering. When integrating with a backend, you can use SSR to pre-fetch data before the page is rendered. This is particularly useful for SEO and for improving the initial load time of your application.
export async function getServerSideProps(context) {
  // Fetch data from an external API
  const res = await fetch(`https://your-backend.com/api/data`);
  const data = await res.json();

  // Pass data to the page via props
  return { props: { data } };
}
Incremental Static Regeneration (ISR)
Next.js offers Incremental Static Regeneration which allows you to update static content after deployment without rebuilding the whole site. This feature is beneficial when integrating with a backend that frequently updates its data.
export async function getStaticProps() {
  const res = await fetch("https://your-backend.com/api/data");
  const data = await res.json();

  return {
    props: {
      data,
    },
    revalidate: 10, // In seconds
  };
}
Environment Variables
When integrating with a backend server, you'll often have different environments for development, staging, and production. Use environment variables to manage different API endpoints or credentials for these environments.
Create a .env.local file for local development:
NEXT_PUBLIC_API_URL=http://localhost:3001/api
And in your Next.js code:
const apiUrl = process.env.NEXT_PUBLIC_API_URL;
Authentication and Authorization
Integrating authentication can be complex, especially in SSR scenarios. Consider using NextAuth.js for a simpler authentication flow. It supports various providers and handles sessions, tokens, and redirects elegantly.
API Client Libraries
While fetch is straightforward for making HTTP requests, you might consider using libraries like Axios for more advanced features like automatic transforms of JSON data, request and response interception, and better error handling.
Error Handling
Robust error handling is crucial for a good user experience. Handle API errors gracefully and provide useful feedback to the user. In your API calls, always include try...catch blocks to catch and handle errors.
try {
  const res = await fetch(`${apiUrl}/data`);
  if (!res.ok) {
    throw new Error(`Error: ${res.status}`);
  }
  const data = await res.json();
  // ... use data
} catch (error) {
  console.error("Failed to fetch data:", error);
  // Handle error in UI
}
WebSockets for Real-Time Data
For applications requiring real-time data (like chat apps or live updates), consider integrating WebSockets. This can be achieved using libraries like Socket.IO, both on your backend server and in your Next.js app.
Code Splitting and Lazy Loading
Next.js automatically optimizes your application by splitting code into smaller bundles and only loading what's necessary for the current route. You can further optimize by dynamically importing modules and components only when they are needed.
Monitoring and Analytics
Finally, monitor the performance and usage of your application. Integrating analytics tools like Google Analytics or using monitoring services like Sentry can help you understand user behavior and catch errors in production.
Wrapping Up
Integrating a Next.js application with a backend server opens up a world of possibilities for building full-stack applications. By leveraging Next.js features like SSR and ISR, and following best practices in security, performance, and error handling, you can build efficient, scalable, and user-friendly web applications. Remember, the key is to maintain a clear separation of concerns between your frontend and backend while ensuring they communicate effectively and securely.
Integrating a Next.js application with a backend server involves setting up API endpoints, fetching data within the application, and managing state based on the response. By following best practices for security, performance optimization, and testing, you can create a robust full-stack application that leverages the strengths of both Next.js and your chosen backend technology. Remember, the key to a successful integration lies in understanding both sides of the stack and how they can efficiently work together to create a seamless user experience.


