
How to use Next.js with a headless CMS?
The combination of Next.js and headless Content Management Systems (CMS) has emerged as a powerful duo for building modern, scalable, and flexible web applications. Next.js, a React framework, offers server-side rendering, static site generation, and many optimization features out of the box. A headless CMS, on the other hand, provides a backend for managing content, decoupled from the presentation layer, allowing developers to use any technology to display the content. This guide will walk you through the process of integrating Next.js with a headless CMS, covering the basics, benefits, and a step-by-step approach to get you started.
Understanding the Basics
What is Next.js?
Next.js is an open-source React framework that enables functionalities such as server-side rendering and generating static websites for React-based web applications. It aims to improve user experience and development efficiency by providing features like automatic code splitting, optimized prefetching, and more.
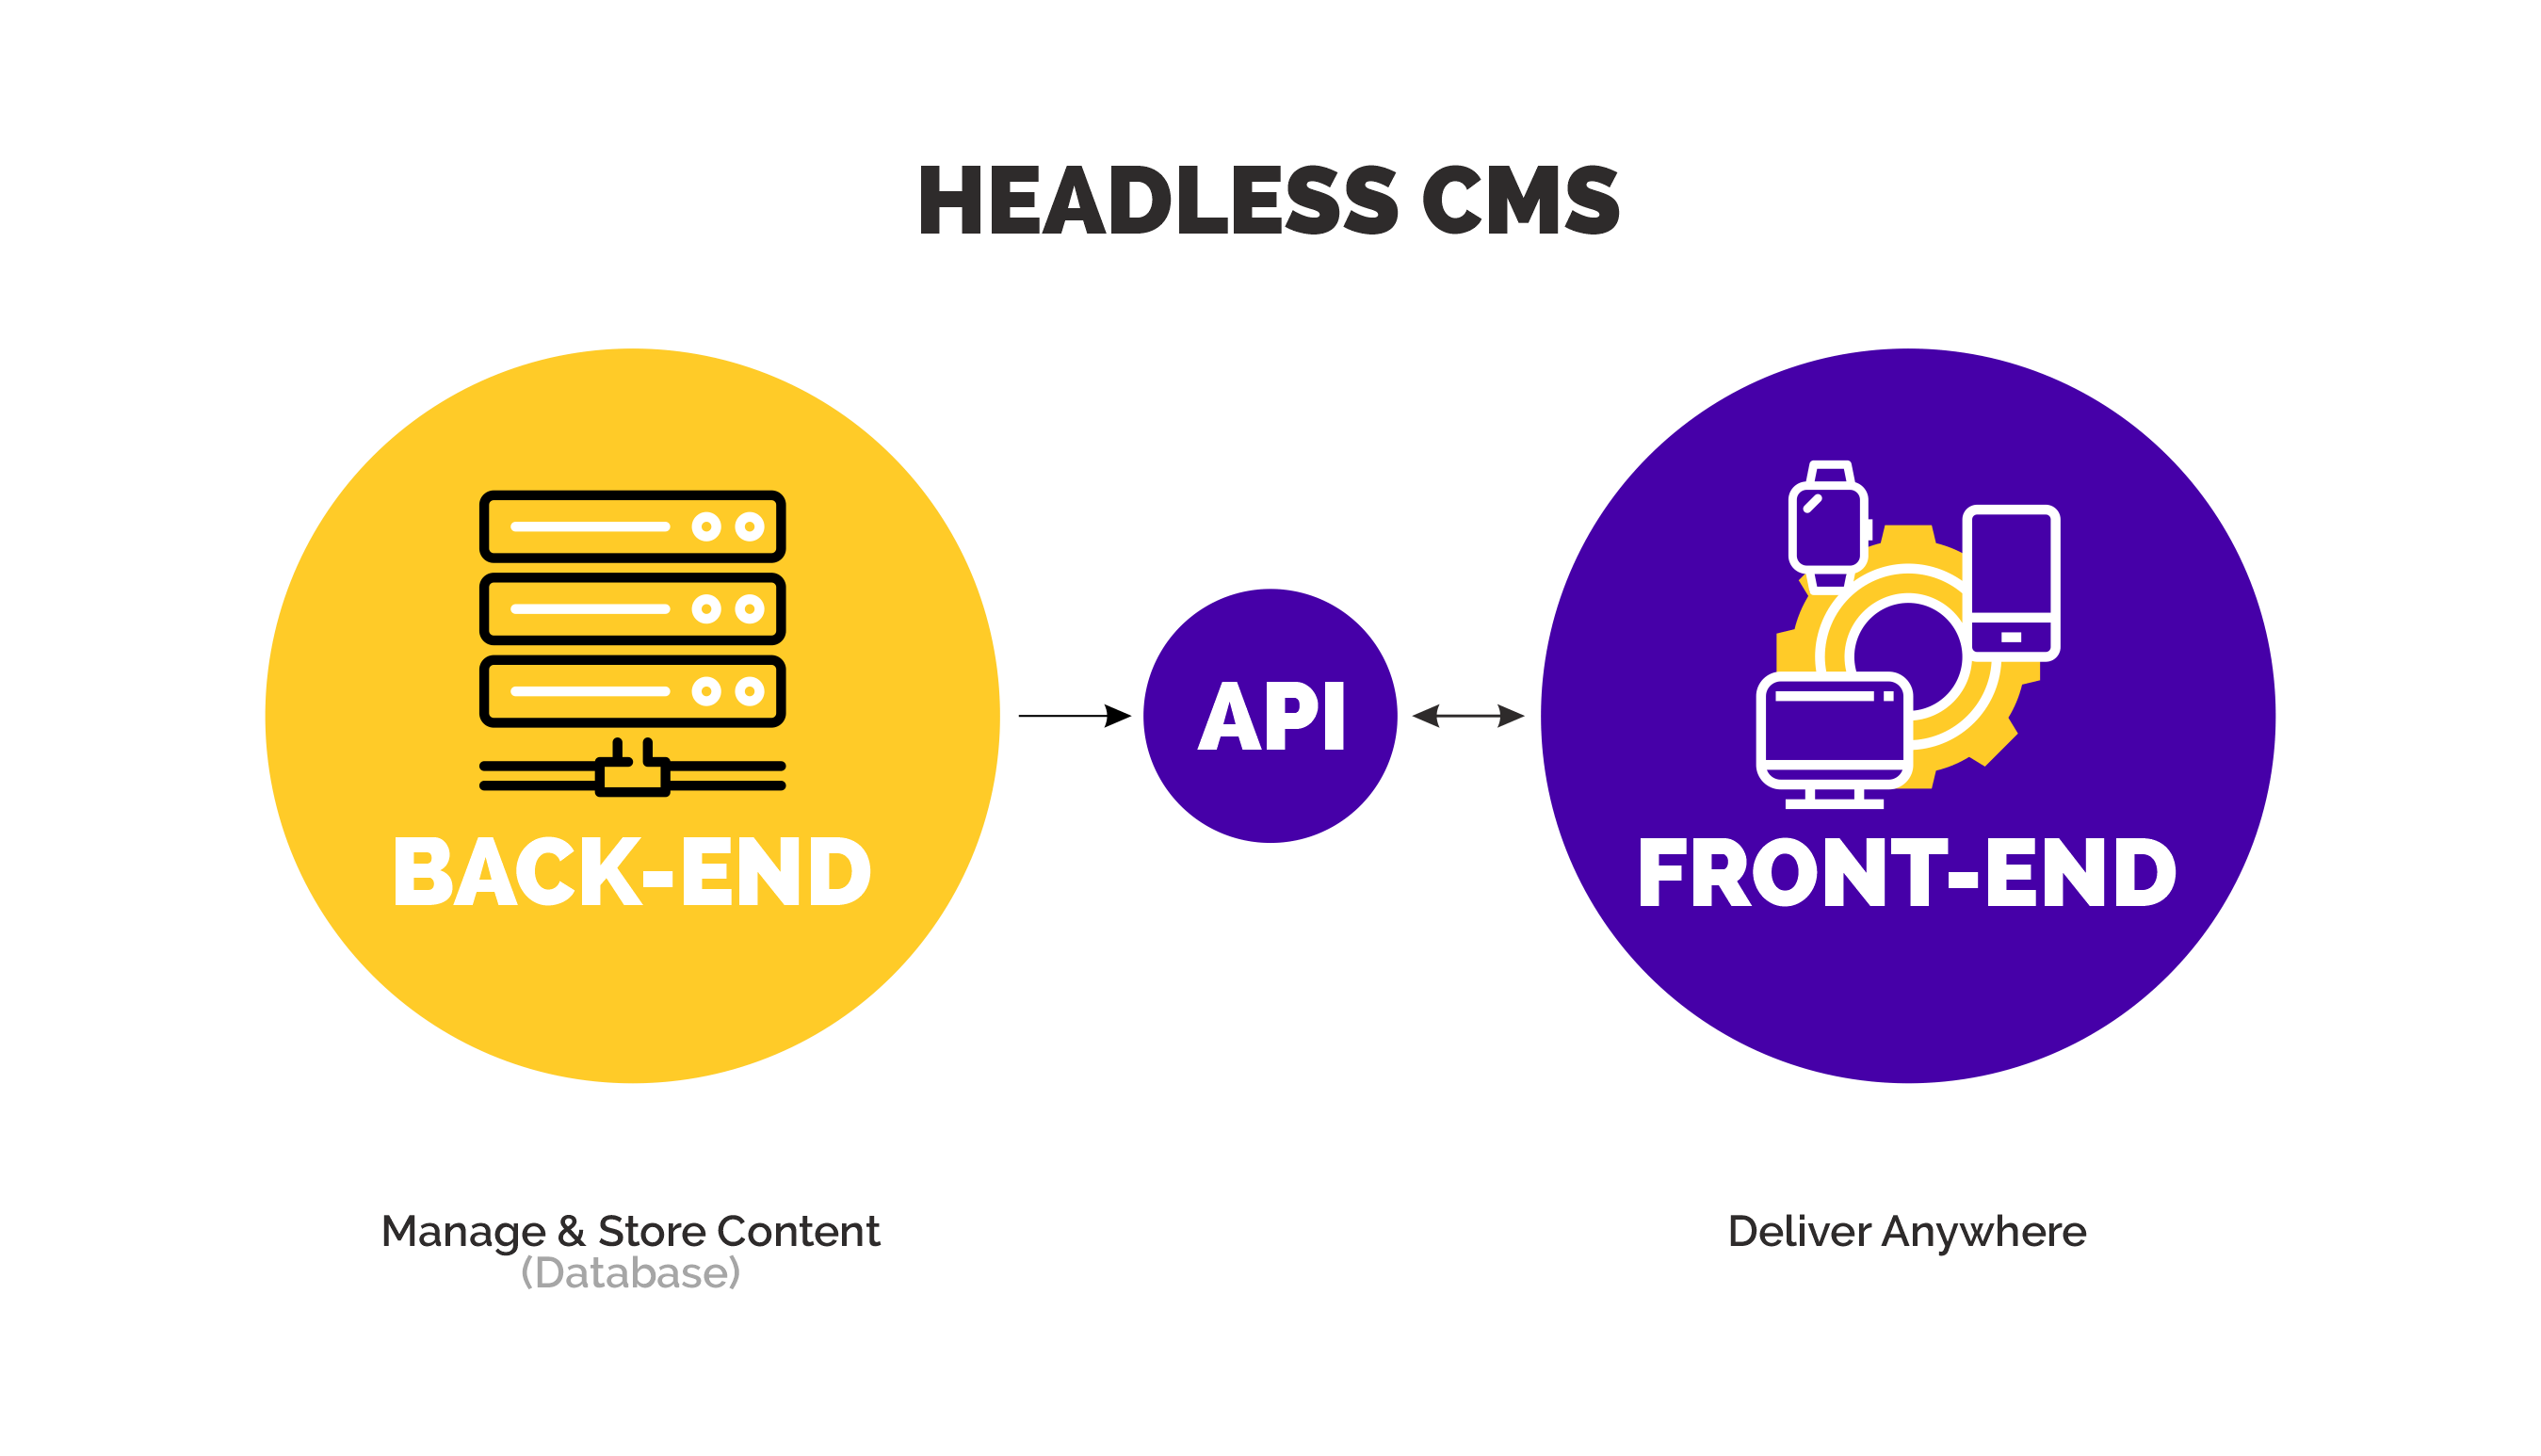
What is a Headless CMS?
A headless CMS is a back-end only content management system built from the ground up as a content repository. It makes content accessible via a RESTful API or GraphQL for display on any device, without a built-in front-end or presentation layer. This architecture offers developers the freedom to create unique frontend experiences.
Why Use Next.js with a Headless CMS?
- Flexibility and Scalability: This combination allows developers to leverage the flexibility of Next.js in building the front end, with the ability to scale content globally through a headless CMS.
- Enhanced Performance: Next.js optimizes your application for performance by default, and using a headless CMS ensures that your content delivery is as fast and efficient as possible.
- Developer Experience: Developers can work with their preferred tools and frameworks on the front end, while content editors can manage content in an intuitive interface, independent of the front-end technology.
- Omnichannel Delivery: A headless CMS can deliver content to any platform with an internet connection, providing a consistent experience across all devices.
How to Use Next.js with a Headless CMS
For this guide, we'll assume you have basic knowledge of JavaScript and React. We will use Next.js as our frontend framework and take Contentful, a popular headless CMS, as an example for our backend content management. The steps, however, are generally applicable to other headless CMS options as well.
Step 1: Setting Up Your Next.js Project
First, create a new Next.js project if you haven’t already:
npx create-next-app@latest my-nextjs-site
cd my-nextjs-site
Step 2: Setting Up Your Headless CMS
- Sign Up and Create a Space: Go to Contentful's website (or your chosen headless CMS) and sign up. After logging in, create a new space where your content will live.
- Create Content Models: Define your content models. These are the structures of the different types of content you'll manage, like blog posts, products, etc.
- Add Content: Populate your content models with items. Each item will be a piece of content that your Next.js application can retrieve and display.
Step 3: Connecting Next.js to Your Headless CMS
Install the SDK: Most headless CMS providers offer an SDK to simplify fetching content in your application. For Contentful, you can use their SDK by running:
npm install contentful
Set Up Environment Variables: Store your Contentful space ID and API access tokens as environment variables in .env.local to keep them secure:
CONTENTFUL_SPACE_ID=your_space_id
CONTENTFUL_ACCESS_TOKEN=your_access_token
Fetch Content in Next.js: Utilize getStaticProps or getServerSideProps in your Next.js pages to fetch content from Contentful at build time or on each request, respectively.
Example fetching a list of blog posts:
import { createClient } from "contentful";

export async function getStaticProps() {
  const client = createClient({
    space: process.env.CONTENTFUL_SPACE_ID,
    accessToken: process.env.CONTENTFUL_ACCESS_TOKEN,
  });

  const res = await client.getEntries({ content_type: "blogPost" });

  return {
    props: {
      posts: res.items,
    },
    revalidate: 1,
  };
}
Step 4: Displaying Content
With your content fetched, you can now use it in your React components to build out your site's UI:
export default function Home({ posts }) {
  return (
    <div>
      <h1>Blog Posts</h1>
      {posts.map((post) => (
        <div key={post.sys.id}>
          <h2>{post.fields.title}</h2>
          <p>{post.fields.description}</p>
        </div>
      ))}
    </div>
  );
}
Step 5: Deploy Your Next.js Application
After you've built your application, you can deploy it using a service like Vercel, Netlify, or any hosting provider that supports Node.js.
Advanced Integration Techniques
After mastering the basics of integrating Next.js with a headless CMS, you may want to explore more advanced techniques to further enhance your web application's capabilities and performance. Here are some advanced topics you might consider:
Incremental Static Regeneration (ISR)
Incremental Static Regeneration (ISR) is a feature provided by Next.js that allows you to update static pages after they've been deployed without needing to rebuild the entire site. This is particularly useful when you have content that changes frequently but still want to benefit from the speed of static pages. You can specify an ISR revalidation time in getStaticProps:
export async function getStaticProps() {
  // Fetch data from headless CMS
  return {
    props: {
      // your props here
    },
    // Revalidate at most once every 10 seconds
    revalidate: 10,
  };
}
Dynamic Routing
Next.js supports dynamic routing, which allows you to create pages that can dynamically display content based on the URL. This is especially useful for blog posts, product pages, or any scenario where you want to use a template for displaying different content based on some identifier. To implement dynamic routing with a headless CMS:
- Create a file in your
pagesdirectory that follows the[id].jsnaming convention. - Use
getStaticPathsto fetch all possible paths from your headless CMS. - Use
getStaticPropsto fetch the data for each individual page based on the ID.
Using the GraphQL API
Many headless CMS platforms offer a GraphQL API, which allows for more efficient data fetching by letting you specify exactly which fields you want. If your chosen CMS supports GraphQL, consider using it instead of the REST API to reduce the amount of data transferred and speed up your application. You will likely need to install a GraphQL client like Apollo Client or urql in your Next.js project.
Image Optimization
Images often account for most of the downloaded bytes on a web page. Next.js offers a built-in Image component that automatically optimizes images. When using images from a headless CMS, make sure to use this component to improve loading times and Core Web Vitals scores. The next/image component supports lazy loading, image resizing, and optimization out of the box.
import Image from "next/image";

export default function MyComponent({ imageUrl, title }) {
  return (
    <div>
      <Image src={imageUrl} alt={title} width={500} height={300} />
      <h2>{title}</h2>
    </div>
  );
}
Localization and Internationalization
If your web application targets users in multiple countries or languages, integrating localization and internationalization is crucial. Many headless CMS platforms support managing content in multiple languages. Next.js also has built-in support for internationalized routing. Combining these features allows you to build a global, multilingual web application with ease.
Next Steps
Integrating Next.js with a headless CMS offers a modern, efficient, and scalable approach to building web applications. Starting with the basics and gradually adopting more advanced techniques, you can tailor the integration to suit your project's needs, enhancing both developer and user experiences.
As you become more comfortable with this setup, continue exploring the features and plugins offered by your headless CMS, as well as the ever-growing ecosystem of Next.js. Both platforms are continuously evolving, with new features and improvements that can further enhance your projects. The combination of Next.js and a headless CMS not only future-proofs your web applications but also opens up endless possibilities for creativity and innovation in web development.
Leveraging Serverless Functions with Next.js and Headless CMS
One of the powerful features of Next.js is its support for API routes, which allows you to create serverless functions directly within your Next.js application. This feature can be particularly useful when integrating with a headless CMS, as it enables you to build custom API endpoints for processing or augmenting your CMS data before it reaches the frontend.
Creating Custom API Endpoints
To create an API route in Next.js, you simply add a JavaScript file to the pages/api directory. Each file within this directory is treated as an API endpoint. For instance, if you wanted to create an endpoint that fetches a specific piece of content from your headless CMS and performs some transformation on it, you could do so as follows:
-
Create an API Route: In your Next.js project, navigate to the
pages/apidirectory and create a new file, such ascontent.js. -
Implement the API Logic: Use the SDK of your headless CMS to fetch data within the API route. You can then manipulate this data as needed before sending it to the frontend.
// pages/api/content.js
import { createClient } from "contentful";

export default async (req, res) => {
  const client = createClient({
    space: process.env.CONTENTFUL_SPACE_ID,
    accessToken: process.env.CONTENTFUL_ACCESS_TOKEN,
  });

  const { id } = req.query;
  try {
    const entry = await client.getEntry(id);
    // Perform any data manipulation here
    res.status(200).json(entry);
  } catch (error) {
    res.status(500).json({ error: "Failed to fetch data" });
  }
};
This serverless function can now be called from any part of your application to retrieve and process data from your headless CMS dynamically.
Securing API Routes
When building API routes, it's important to consider security, especially if you're handling sensitive data or performing actions that could affect your CMS data. Next.js provides a few mechanisms to help secure your API routes:
- Environment Variables: Store sensitive information like API keys and access tokens in environment variables, not in your source code.
- API Route Middleware: Use middleware in your API routes to implement authentication and authorization checks.
- Rate Limiting: Implement rate limiting on your API routes to prevent abuse.
Combining Static Generation with Serverless Functions
A powerful pattern is combining Next.js's static generation features with serverless functions to build highly dynamic, efficient, and scalable applications. You can statically generate parts of your application that have relatively static content while using serverless functions to handle dynamic data fetching or processing. This approach gives you the best of both worlds: the performance benefits of static generation and the flexibility of serverless functions.
For example, you could statically generate a blog using content from your headless CMS but use a serverless function to add comments to each post dynamically.
Monitoring and Performance
As you build out your Next.js application with serverless functions and integrate with a headless CMS, monitoring performance becomes crucial. Next.js and Vercel provide built-in analytics and performance monitoring tools that can help you understand how your application is performing in production. Additionally, consider leveraging third-party monitoring tools to track API response times, static generation performance, and other critical metrics.
Optimizing performance and SEO in Next.js with a headless CMS
Performance and search engine optimization (SEO) are crucial aspects of any website. In this section, we'll explore how you can optimize performance and SEO in Next.js with a headless CMS. Next.js provides several features that help optimize performance, such as server-side rendering (SSR) and static site generation (SSG). By leveraging these features, you can ensure that your website loads quickly and provides a smooth user experience.
Server-side rendering (SSR) allows Next.js to generate the HTML for each page on the server and send it to the client. This significantly reduces the time to first render and improves perceived performance. SSR is especially useful for pages that require real-time or personalized data, as it allows the server to fetch the required data and render the page dynamically.
Static site generation (SSG) is another powerful feature of Next.js that improves performance. SSG allows you to pre-render pages at build time, generating static HTML files that can be served directly by a CDN. This eliminates the need to generate the page on each request, resulting in faster page loads and reduced server load.
To optimize SEO in Next.js, you'll need to ensure that your website's content is properly structured and accessible to search engines. Using a headless CMS allows you to define structured content types and fields, making it easier to organize and present your content. Properly structured content helps search engines understand the context and relevance of your website's pages.
Next.js provides built-in support for SEO optimization through the Head> component. This component allows you to define meta tags, such as title, description, and keywords, for each page. By providing relevant and descriptive meta tags, you can improve the visibility of your website in search engine results.
In addition to proper content structure and meta tags, you should also ensure that your website is optimized for performance. This includes optimizing images, minifying CSS and JavaScript files, and leveraging browser caching. By reducing the size and number of network requests, you can improve the loading speed of your website, which is a key factor in SEO rankings.
Optimizing performance and SEO in Next.js with a headless CMS, you can ensure that your website is fast, accessible, and search engine friendly, providing a great experience for both users and search engines.
Best practices for using Next.js with a headless CMS
Now that we've covered the benefits, setup, content management, dynamic routing, and optimization aspects of using Next.js with a headless CMS, let's discuss some best practices to keep in mind when working with this powerful combination.
Plan your content structure: Before diving into development, spend time planning and defining your content structure. This will make it easier to manage and present your content in Next.js. Use reusable components: Create reusable components in Next.js that can be used across multiple pages. This will help maintain consistency and reduce code duplication.
Implement caching: Implement content caching in Next.js to improve performance and reduce the load on your headless CMS. Caching can be done at the server level or using a CDN.
Monitor performance: Regularly monitor the performance of your Next.js website using tools like Lighthouse or Google PageSpeed Insights. Identify and fix any performance bottlenecks to ensure a smooth user experience.
Regularly update dependencies: Keep your Next.js and headless CMS dependencies up-to-date to take advantage of the latest features and security patches.
Test thoroughly: Thoroughly test your Next.js website with different content scenarios and traffic loads. This will help identify any issues or performance bottlenecks before deploying to production.
Follow SEO best practices: Ensure that your website follows SEO best practices, such as using descriptive meta tags, proper URL structure, and optimized content.
Conclusion
Integrating Next.js with a headless CMS and leveraging Next.js's serverless functions can significantly enhance your web application's flexibility, performance, and scalability. Following best practices for security, combining static generation with dynamic data fetching, and monitoring your application's performance, you can build robust, efficient, and highly dynamic web applications that scale with your needs.


