
How to deploy Next.js application to Vercel?
Next.js is a popular React framework that enables developers to build server-rendered React applications with ease. Vercel, formerly known as ZEIT, is a cloud platform that simplifies the process of deploying and hosting web applications, including Next.js applications. In this guide, you will learn how to deploy your Next.js application to Vercel, leveraging its powerful features and optimizations.
Next.js has gained significant traction in the web development community due to its ability to deliver exceptional performance, scalability, and developer experience. By leveraging server-side rendering (SSR) and static site generation (SSG), Next.js applications can load faster and provide a seamless user experience. Vercel, on the other hand, is a platform designed to streamline the deployment process, making it easier for developers to focus on building great applications without worrying about complex infrastructure setup and maintenance.
Benefits of deploying your Next.js application to Vercel
Deploying your Next.js application to Vercel offers several advantages:
Seamless Integration: Vercel is tightly integrated with Next.js, making the deployment process smooth and straightforward.
Automatic Optimizations: Vercel automatically optimizes your Next.js application for performance, including code splitting, image optimization, and more.
Serverless Functions: Vercel supports serverless functions, allowing you to easily add dynamic functionality to your Next.js application.
Global Content Delivery Network (CDN): Vercel's global CDN ensures that your application is delivered to users with low latency, improving the overall user experience.
Continuous Deployment: Vercel supports continuous deployment, enabling you to automatically deploy your application whenever you push changes to your Git repository.
Preview Deployments: Vercel allows you to preview your application changes before deploying them to production, ensuring a smooth and reliable release process.
Collaboration and Team Management: Vercel provides features for team collaboration, including access controls, environment variables, and deployment logs.
Setting up your Vercel account
Before you can deploy your Next.js application to Vercel, you need to create an account. Follow these steps:
- Visit the Vercel website https://vercel.com and click on the "Sign Up" button.
- Choose to sign up with your preferred method (GitHub, GitLab, or email).
- If you sign up with GitHub or GitLab, you will be prompted to grant Vercel access to your account.
- Once you've signed up, you'll be redirected to the Vercel dashboard.
Creating a Next.js application
Before you can deploy anything, you need to have your Next.js app ready. If you already have one, great! If not, you can quickly create a new one.
To get started with a fresh Next.js app, simply run this command in your terminal:
npx create-next-app@latest
This will generate a basic Next.js application. Navigate to the directory:
cd my-nextjs-app
Start the development server by running:
npm run dev
Your Next.js application should now be running locally at http://localhost:3000.
Now, feel free to make any changes or customizations you need. Once you're satisfied, it's time to deploy.
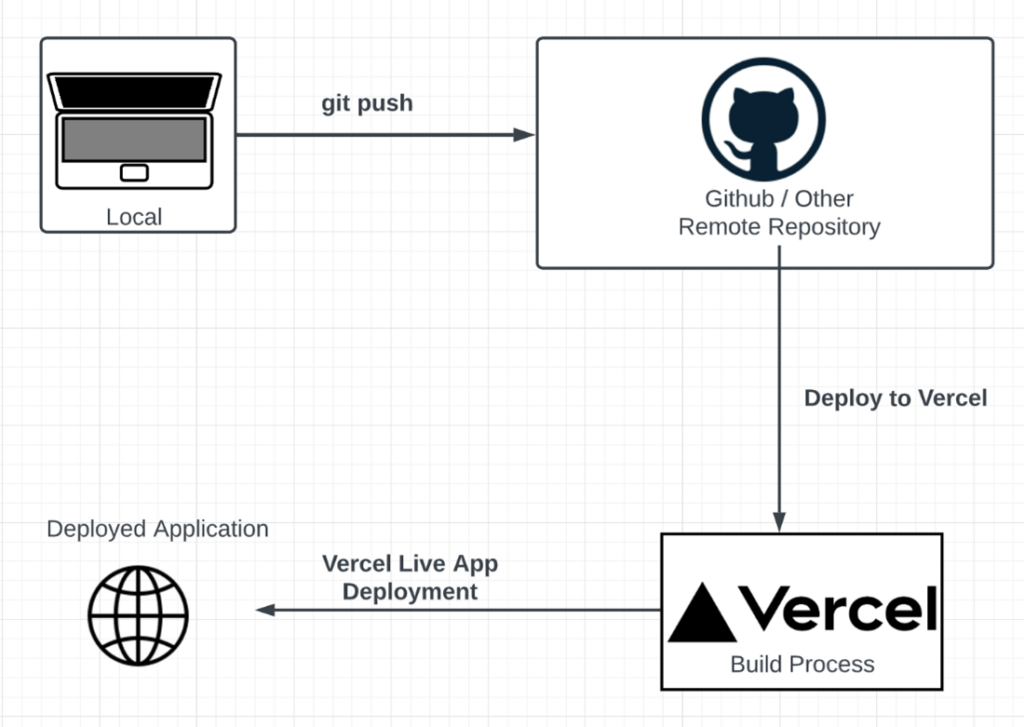
Connect Vercel to Your Git Repository
Once you're logged into Vercel, you'll want to connect your Git repository. If your project is hosted on GitHub, GitLab, or Bitbucket, Vercel can seamlessly pull the code directly from there.
Here’s how you can connect:
- From the Vercel dashboard, click on the “New Project” button.
- Vercel will ask for permission to access your Git repositories. Give it permission to access the one where your Next.js app is stored.
- Select your repository from the list.
If everything is connected properly, Vercel will detect that your app is built with Next.js and automatically configure the deployment settings for you.
Configuring your Next.js application for deployment on Vercel
Before deploying your Next.js application to Vercel, you may need to configure it to ensure a smooth deployment process. Here are some common configurations:
Environment Variables: If your application requires environment variables, you can add them in the Vercel dashboard or in a .env file.
Build Settings: Vercel automatically detects the build settings for Next.js applications, but you can customize them if needed in the vercel.json file.
API Routes: If your application uses API routes, make sure they are properly configured and tested locally before deploying.
Static Assets: Ensure that any static assets (images, fonts, etc.) are properly imported and referenced in your application.
Root Directory: If your Next.js project is located in a subfolder, make sure you specify the correct directory.
Deploying your Next.js application to Vercel
Once you've set up your Vercel account and configured your Next.js application, you're ready to deploy. Follow these steps:
- In the Vercel dashboard, click on the "New Project" button.
- You'll be prompted to import a Git repository. Choose the repository that contains your Next.js application.
- Vercel will automatically detect that it's a Next.js application and provide you with the appropriate build settings.
- Review the build settings and make any necessary adjustments.
- Click on the "Deploy" button to initiate the deployment process.
Vercel will now build and deploy your Next.js application. You can monitor the progress in the deployment logs.
Check Your Deployment
Once the build is complete, Vercel will provide you with a live URL where your app is now hosted. It’s that easy! You can visit the URL to see your Next.js app live on the web.
Continuous Deployment
One of the best things about deploying with Vercel is that it automatically sets up continuous deployment for you. This means that any time you push new changes to your Git repository, Vercel will automatically rebuild and redeploy your app.
Custom Domain (Optional)
If you have a custom domain, you can easily connect it to your Vercel project. From the Vercel dashboard, go to your project settings, and under Domains, click Add Domain. Enter your domain name, and Vercel will guide you through the process of configuring your DNS settings to point to Vercel’s servers.
Bonus Tips for a Smooth Deployment
- Check Environment Variables: If your app relies on environment variables, make sure to set them correctly in Vercel’s settings under the “Environment Variables” section.
- Monitor Logs: If something goes wrong during deployment, Vercel provides real-time logs so you can see what’s happening. Use these logs to troubleshoot any issues.
- Enable Preview Deployments: Vercel also offers preview deployments for each pull request, so you can see changes in a staging environment before they go live.
Managing your Next.js application on Vercel
After your Next.js application has been deployed to Vercel, you can manage it through the Vercel dashboard. Here are some key features:
Deployment History: View a history of all deployments, including the commit hash, deployment time, and deployment status.
Environment Variables: Set and manage environment variables for your application.
Domains: Configure custom domains for your application and manage SSL certificates.
Monitoring and Analytics: Monitor your application's performance, view analytics, and set up alerts. Integrations: Integrate your Vercel deployment with other tools and services, such as GitHub, Slack, and more.
Understanding Vercel’s Build and Hosting Structure
To really make the most of Vercel, it's important to understand how the platform works under the hood. When you deploy your Next.js app, Vercel automatically configures:
- Edge Network: Your app is hosted on Vercel’s edge network, which ensures that it loads quickly no matter where in the world your users are. Vercel caches your pages at the edge, so content is delivered from servers closest to the user.
- Automatic Scalability: Vercel scales your application based on the number of requests, so you don’t need to worry about infrastructure or managing server load. Whether you have 10 visitors or 10,000, Vercel handles it smoothly.
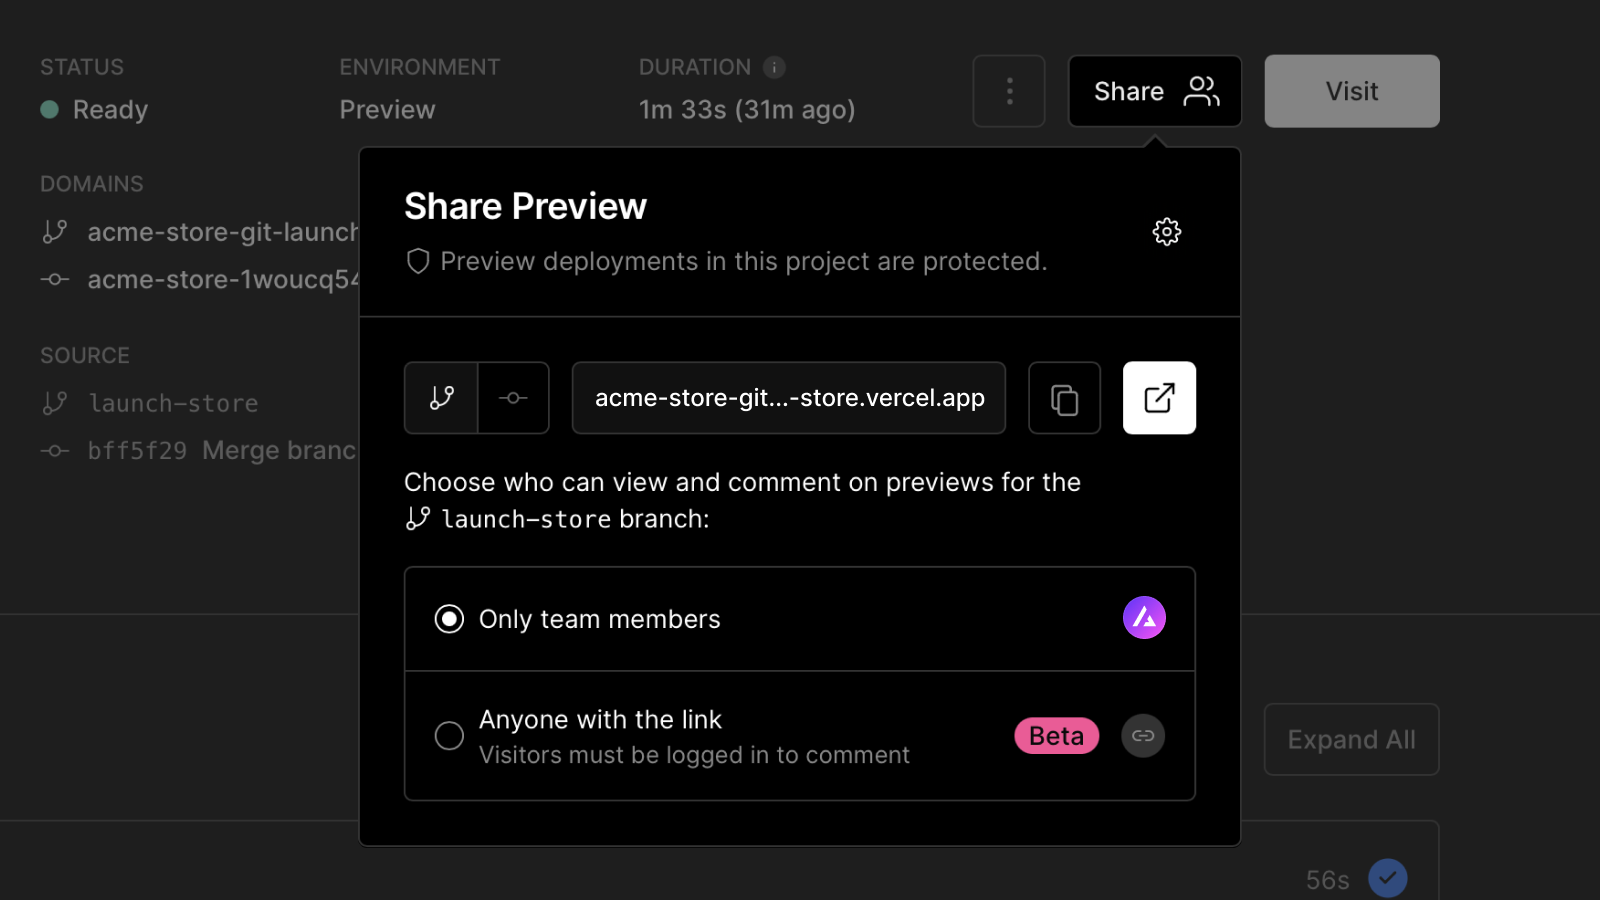
Preview Deployments with Vercel
One of the coolest features that Vercel offers is preview deployments. Every time you open a pull request (PR) or push code to a new branch, Vercel creates a preview environment. This means you can test your changes before merging them into the main branch.
Here’s how you can use preview deployments effectively:
- Collaborate with Your Team: Send your team the unique URL for the preview deployment to get feedback on new features or fixes before they go live.
- Test New Features in Isolation: Since each branch gets its own deployment URL, you can test new features without affecting the production version of your app.
Preview deployments allow you to catch issues early, ensuring that only polished and fully functional code makes it to production.
Managing Environment Variables for Different Environments
When deploying an app, you often have separate configurations for development, staging, and production environments. Vercel makes managing these environments simple.
Here’s how you can set it up:
- Go to your project’s settings in the Vercel dashboard.
- Navigate to the Environment Variables section.
- Add your environment variables for production, preview, and development environments.
For example, you might have a different API key for development versus production. By assigning specific environment variables to different environments, Vercel ensures that each version of your app gets the right configurations.
Custom Build Settings
Vercel automatically detects the best settings for your Next.js app, but if you have specific requirements, you can customize the build process.
- Custom Build Commands: By default, Vercel uses
npm run buildto build your project. However, if your app has unique needs, you can change the build command in your project settings on Vercel. - Output Directory: Most Next.js apps output to the
.nextfolder, but if you have a custom output folder, you can specify that in Vercel’s settings as well.
Connecting to a Database
If your Next.js app relies on a database (like MySQL, PostgreSQL, or MongoDB), you’ll need to ensure that Vercel has access to it.
Here’s what you can do:
- Host Your Database Externally: Vercel doesn’t host databases, so you’ll need to use an external service like PlanetScale, Supabase, or MongoDB Atlas. Make sure you add the connection details as environment variables in Vercel’s settings.
- Serverless Database Connections: If you’re using a serverless database connection, Vercel’s serverless functions make it easy to connect securely and efficiently.
Handling Serverless Functions in Vercel
Next.js integrates seamlessly with serverless functions, and Vercel offers native support for this. If your app includes API routes, those routes are deployed as serverless functions on Vercel. These functions are lightweight, scale automatically, and only run when they’re needed, which is perfect for handling dynamic content or API calls.

Here’s how it works:
- Inside your Next.js project, you can create an
apifolder under thepagesdirectory. - Any files in this
apidirectory become serverless functions. For example, if you have a file calledhello.jsinsidepages/api, you can access this API route atyourdomain.com/api/hello. - These functions can interact with databases, external APIs, or process any dynamic content needed.
Serverless functions are a great way to handle backend logic while keeping everything inside your Next.js project.
Optimizing Your Next.js App for Vercel
To make sure your Next.js app runs as smoothly as possible on Vercel, here are a few optimization tips:
-
Use Static Generation Whenever Possible: Static pages are cached at the edge, making them super fast. If your content doesn’t change often, consider using getStaticProps instead of getServerSideProps to generate static pages.
-
Leverage Image Optimization: Next.js has built-in image optimization, and Vercel supports this out of the box. Use the
<Image />component in Next.js to serve optimized images, which will be automatically resized and served in modern formats like WebP. -
Monitor Your App’s Performance: Vercel offers built-in analytics so you can track your app’s performance, including loading times, user locations, and cache hits/misses. Use this data to optimize your app further.
Advanced features and optimizations on Vercel
Vercel provides several advanced features and optimizations to enhance the performance and functionality of your Next.js application:
Serverless Functions: Vercel supports serverless functions, allowing you to add dynamic functionality to your Next.js application without managing servers.
Image Optimization: Vercel automatically optimizes images in your Next.js application, reducing file sizes and improving load times.
Preview Deployments: Preview your application changes before deploying them to production, ensuring a smooth and reliable release process.
Incremental Static Regeneration (ISR): Vercel supports Incremental Static Regeneration, which allows you to update static pages on-demand, providing a balance between static and dynamic content.
Caching and CDN: Vercel's global CDN and caching mechanisms ensure that your application is delivered to users with low latency, improving the overall user experience.
Troubleshooting common issues when deploying to Vercel
While deploying your Next.js application to Vercel is generally a straightforward process, you may encounter some common issues. Here are a few troubleshooting tips:
Build Errors: If you encounter build errors, check the deployment logs for more information. Common causes include missing dependencies, incorrect configuration, or incompatible code.
Environment Variables: Ensure that your environment variables are correctly set in the Vercel dashboard or in your .env file.
API Routes: If your application's API routes are not working as expected, double-check the configuration and test them locally before deploying.
Static Assets: If static assets (images, fonts, etc.) are not loading correctly, verify that they are properly imported and referenced in your application.
Caching Issues: If you're experiencing caching issues, try clearing the Vercel cache or adjusting the caching settings in the Vercel dashboard.
App Not Loading: If your app doesn’t load after deployment, make sure you’ve set up the correct environment variables. Also, ensure there are no issues with external services like databases or APIs that your app relies on.
404 Errors on Pages: If some of your pages aren’t loading and return a 404, make sure the routes are properly configured and that you haven’t missed any dynamic route handling in Next.js.
If you encounter any issues that you can't resolve, don't hesitate to reach out to the Vercel support team or consult the official documentation and community forums.
FAQ: Deploying a Next.js Application to Vercel

Before deploying to Vercel, make sure you have:
- A Next.js application ready to go.
- A Vercel account (you can sign up for free).
- Your code hosted in a Git repository like GitHub, GitLab, or Bitbucket, as Vercel pulls directly from these services.
Yes! Vercel is designed for seamless Next.js deployments. When you connect your Git repository to Vercel, it will automatically detect the Next.js framework and configure your deployment settings without you needing to do anything extra.
To set environment variables:
- Go to your project’s settings in the Vercel dashboard.
- Under the Environment Variables section, add the key-value pairs for your variables.
- You can set different variables for production, preview, and development environments.
Vercel sets up continuous deployment by default. Every time you push new code to the main branch (or any branch), Vercel automatically rebuilds and redeploys your Next.js app. If you push to a non-main branch, it will create a preview deployment for you to test.
Yes, you can easily connect a custom domain to your project:
- In the Vercel dashboard, go to Domains under your project settings.
- Click Add Domain and enter your custom domain.
- Follow the instructions to update your DNS settings.
Vercel lets you create separate environments for production, preview, and development. You can set environment variables for each one in the project settings under the Environment Variables section. This allows you to have different configurations for each stage of development.
Preview deployments are automatically created for each branch or pull request (PR) in your Git repository. These preview URLs let you test new features or fixes before they go live. It’s a great way to share a staging version of your app with your team.
Vercel doesn’t host databases, but you can connect to an external database like PlanetScale, Supabase, or MongoDB Atlas. You’ll need to store your database credentials in Vercel’s environment variables.
Serverless functions are backend APIs that run on demand. In a Next.js app, you can create serverless functions by adding API routes under the pages/api directory. These functions are automatically deployed and scaled by Vercel, and you can access them via your app’s URL.
If your deployment fails, check the build logs in the Vercel dashboard. The logs provide detailed information about any errors that occurred during the build process. Common issues include missing dependencies or incorrectly configured environment variables.
Conclusion
Deploying your Next.js application to Vercel is a straightforward process that can significantly improve your application's performance, scalability, and developer experience. By following the steps outlined in this guide, you can leverage the power of Vercel to streamline your deployment process and take advantage of its advanced features and optimizations.
After successfully deploying your Next.js application to Vercel, you can explore additional features and integrations to further enhance your application's functionality and development workflow. Consider integrating Vercel with other tools and services, such as GitHub for version control, Sentry for error monitoring, and Algolia for search functionality.
Remember, the web development landscape is constantly evolving, and it's essential to stay up-to-date with the latest trends, best practices, and technologies. Continuously learn and experiment with new tools and frameworks to improve your skills and deliver exceptional web applications.
If you need assistance with deploying your Next.js application to Vercel or have any other web development needs, feel free to contact us. Our team of experienced developers is ready to help you achieve your goals and take your web projects to the next level.
Happy coding!
Here are some useful references to help you as you deploy your Next.js application to Vercel and optimize the process further:
1. Vercel Documentation
The official documentation provides a comprehensive guide on deploying Next.js apps, managing environment variables, using serverless functions, and more:
2. Next.js Documentation
Next.js' official docs have in-depth details about dynamic routing, server-side rendering, static generation, and using APIs in your Next.js application:
3. Setting Environment Variables in Vercel
To learn more about managing environment variables for different environments in Vercel:
4. Connecting Databases to Vercel
For tutorials on connecting databases to your Next.js app hosted on Vercel:
5. Serverless Functions in Vercel
A detailed guide on how to use serverless functions in Vercel for backend APIs:
6. Handling Dynamic Routes in Next.js
To help with setting up and deploying dynamic routes:
7. Vercel Preview Deployments
Learn how to leverage preview deployments to test your code before pushing it to production:
8. Image Optimization with Next.js
If you’re looking to optimize images for performance in your Next.js app:
9. Troubleshooting Vercel Deployments
A helpful resource for troubleshooting failed builds and deployment errors:
10. Vercel Analytics
To learn how to monitor and improve the performance of your Next.js app using Vercel’s built-in analytics:


